Picture Box
Prerequisite Reading
Picture boxes are containers for the chosen images that will be placed in them.
Adding Picture Boxes
A video walk through of adding pictures boxes is available here. In addition, you can follow the steps detailed below:
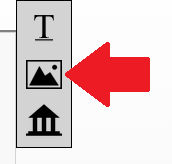
- Find the picture box icon in the tool menu, as highlighted below.

- Click and Drag it onto the stage where you want to place the image.
- Drop the picture box roughly where you wan to place it.
- Once you do, a blue box with a camera icon is displayed, as shown below.

- When you see this image, it means you can begin adjusting its various properties.
Moving a Picture Box
Click and drag the picture box to its new position.
Resizing a Picture Box
- Mouse over any of the sides of the picture box.
- Once you see your cursor change to a 're-size' arrow

 , click and drag to change the dimensions of the box.
 - Once you stop dragging, the dimensions of your box have changed.
Deleting a Picture Box
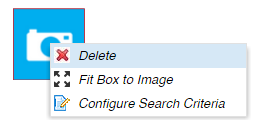
- Right-click on the picture box
- Choose "Delete" from the menu as shown below.

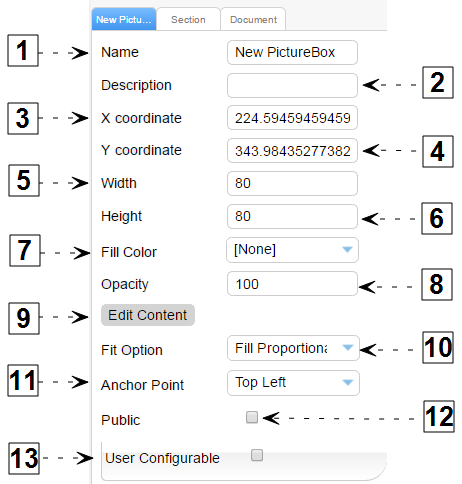
Picture Box Properties

| # | Name | Description |
| 1 | Name | The name of the picture box. |
| 2 | Description |
A description of the picture box. These descriptions are not presented in the Wizard. However, if there are multiple people on your team configuring documents, filling out a description will help others understand the intent of your section(s). |
| 3 | X Coordinate |
The X position relative to the top left of the document Note: If you need precise control of x/y coordinates, you can enter a value here and see it reflected on the stage. |
| 4 | Y Coordinate | The Y position relative to the top left of the document. |
| 5 | Width |
The width of the selected picture box. Note: All dimensions are in points. 72 points to an Inch. |
| 6 | Height | The Height of the selected picture box. |
| 7 | Fill Color |
Fill or Background color of the picture box. The default value is "none" or no background. |
| 8 | Opacity |
The opacity of the picture box. The default value is "100%" |
| 9 | Edit Content | Clicking this serves the same purpose as double clicking on the picture box to change the image. |
| 10 | Fit Option |
If the frame and its content are different sizes, you can use the appropriate option below to achieve the desired fit.
|
| 11 | Anchor Point | You can use this option to anchor your image within the image box. |
| 12 | Public |
See Shared Widgets for more information about the use of the "public" property. |
| 13 | User Configurable |
When enabled, users ordering this document are able to change the image. Enabling this property, addition options are made available as described below. |
User Configurable Properties
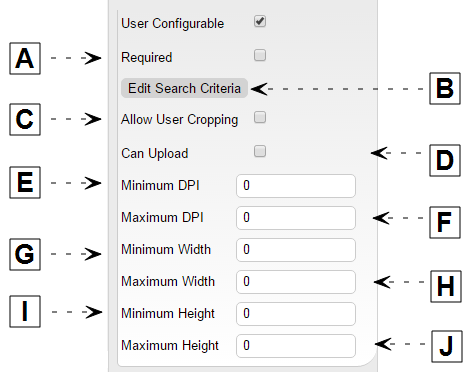
The following additional properties become available if "User Configurable" is enabled.

| # | Name | Description |
| A | Required |
When enabled, users that order this document must choose an image to complete the configuration this document. Note: If a default picture is set, when users order they can choose to use the default image. |
| B | Edit Search Criteria |
Allows you to restrict which images from the Image Library the user has access to in the Wizard ordering process. Example: By restricting access, you could ensure that only images that are in the "Healthcare" category are available. |
| C | Allow User Cropping |
If enabled, users are able to resize the image box. |
| D | Can Upload |
If enabled, users are able to upload images from their desktops. This is additional to choosing images from the Image library. |
| E | Minimum DPI |
If specified, only images whose DPI is greater than or equal to the value specified will be allowed during the ordering process. Example If you're dealing with print output and you wand to ensure that any images uploaded by the end user meet the standard 300 DPI resolution. This will ensure that when the images are printed, they are sharp and clear. |
| F | Maximum DPI |
If specified, only images whose DPI is less than or equal to the value specified will be allowed during the ordering process. |
| G | Minimum Width | If specified, only images whose width (in pixels) is greater than or equal to the value specified will be allowed during the ordering process. |
| H | Maximum Width |
If specified, only images whose width (in pixels) is less than or equal to the value specified will be allowed during the ordering process. |
| I | Minimum Height |
If specified, only images whose height (in pixels) is greater than or equal to the value specified will be allowed during the ordering process. |
| J | Maximum Height | If specified, only images whose height (in pixels) is less than or equal to the value specified will be allowed during the ordering process. |
